Please note that some of the links below may be affiliate links. As an Amazon Associate, I earn from qualifying purchases.

Half a honeycomb block
As mentioned in the last blog post, this one will be about setting up a Raspberry Pi to monitor the network for potential malicious activity. Because knowledge of the device on the network is limited, any connectivity activity to the device’s listener ports should be investigated.
While this can be built in a VM or on repurposed hardware, the actions for the build are the same. However, for this, I’m going to build on a Raspberry Pi. I’ll provide some recommendations, but what you order is up to you. I like to have as many Gigabytes as possible for memory, but smaller ones should work.
Hardware
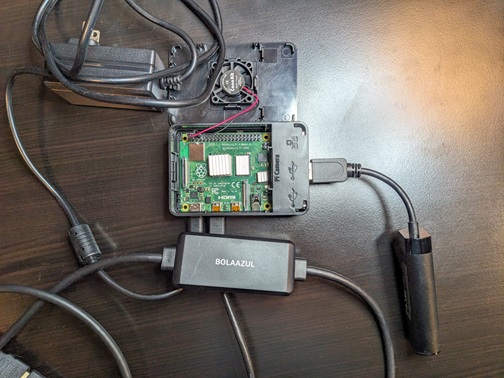
Pi4 with display port adapter
- CanaKit Raspberry Pi 4 8H Starter Kit (Bare minimum)
- USB 3.0 to Gigabit Ethernet Adapter (Recommended for second network card)
- HDMI to DisplayPort adaptor (Optional, I needed to work with Dell monitors)
- POE hat for Rapsberry Pi 4 (I didn’t use it, it will require a different case)
Know your environment
This can be done from the Raspberry Pi before configuring the intrusion detection honeypot script, or it can be done from another device. The purpose is to see what the network segment has as devices. To do this, I use nmap to scan the segment. The main things I’m looking for is what ports are open in the segment and a list of mac addresses.
|
1 2 3 |
sudo nmap –T4 -Pn -n -p- -oA net_scan X.X.X.X/Y grep –o ‘^[0-9]*’ net_scan.txt | sort | uniq –c | sort –rn grep "MAC Address" net_scan.txt | sort -k 3 | uniq |
Some of the ports found in my current test environment:
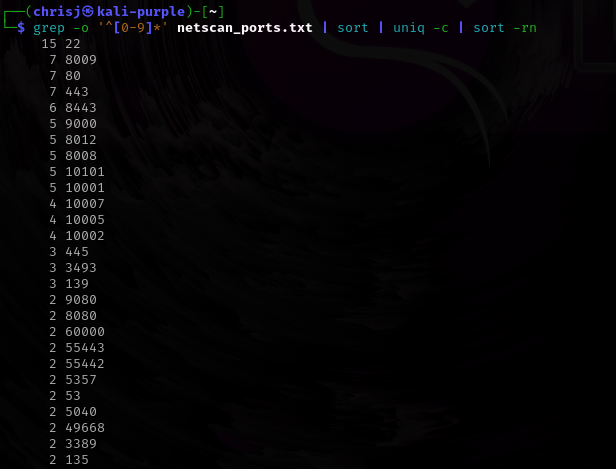
Open Ports
Sample of the MAC addresses in my test environment:
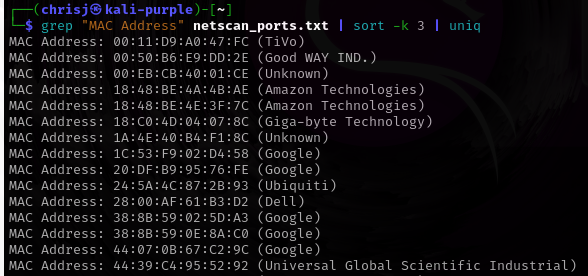
MAC Address
The reason for collecting the data above is to be able to blend into the environment when we deploy the IDH. A few of the things we’ll be doing during the device build is changing the name of the device to match the naming convention of the network, changing the MAC address to look like what is on the network, and setting up the ports on the IDH listener to be the same as the most common ports open on the segment.
IDH Build out
Installing the OS
For this build we won’t need a GUI; we’ll do everything from the command line on the Raspberry Pi.
Grab a MicroSD card and start the Raspberry Pi Imager and select your device type. In my case I’m going with the Raspberry Pi 4. Next choose the OS, since I don’t want a GUI, I go to Raspberry Pi OS (other) > Raspberry PI OS Lite (64-bit). And finally chose your storage.
After clicking next, you’ll get the custom application popup window. I like to edit settings to setup the hostname, username and password, and locale settings under general. Then set up SSH under services so I can connect to it via a terminal window after power-on. It’s your choice if you want to set up a password or private public key pair. Remember, you’re goal is to blend in, so set hostname, user name and key pair option based on your environment.
Also, as a rule, I don’t set up telemetry under the options tab.
First boot setup
In this section, we’re going to go through the items to set up after the first boot.
First, we’ll change the hardware mac address. This is done under /boot/firmware/cmdline
Looking at your MAC address list, find an OUI (another name for the MAC addresses (at a high level)), that shows up the most, or the most for the platform you want to look like. In this case my test environment has multiple Raspberry Pis, but this Pi sticks out, it has a different MAC Address. I changed the MAC Address’ first three groups to the same as the others, and left the last three as were. So, in my case, I used nano to add smsc95xx.macaddr=DC:A6:32:6B:E4:08 To the end of the line. See Raspberry Pi MAC Address Spoofing for more info.
Then reboot.
After the device comes back up, confirm the new MAC Address with ip -a.
Next, update and upgrade the software on the Raspberry Pi. While you’ll get a recent release, there are usually patches after the release. The commands below are my method, I reboot after the first upgrade to load system level changes. I update before the full-upgrade incase something new was added to the repository list. I reboot after the full-upgrade to load lowe- level system changes, and the last update upgrade, in case the full-upgrade changed the repos.
After the patching is done, we’ll add a few extra packages.
|
1 2 3 4 5 6 7 8 9 |
sudo apt update sudo apt upgrade sudo reboot sudo apt update sudo apt full-upgrade sudo reboot sudo apt date sudo apt upgrade sudo apt install ncat rsyslog nmap iptables tmux byobu moreutils lsof git |
Explaining the extra packages
ncat – Netcat, which is a service that will be listening on our ports, comes in multiple flavors. The original deprecated version, a forked version, the Open-BSD version, and the NMAP version. In our case, we’ll use the nmap version.
rsyslog – This is partly because I don’t like logging in systemd. But from some testing I did, we’ll need it to push logs to some log servers or SIEMS (beyond the scope of this blog post).
nmap – in case we need to do local port scan testing, but also in case you’ve pre-built a system before doing environment scanning, as mentioned above.
iptables – ncat doesn’t catch traffic to non-listening ports like TCP 7080, unless you have that open. It sometimes misses nmap scans too. Iptables will be used to catch scanning traffic that ncat misses. I know there is a new version of firewalls in Debian-based systems nftables, but I haven’t had time to learn it, and iptables still works at the time of the blog post.
Tmux and byobu: I like the extra items that byobu provides to screen and tmux, and I enjoy being able to have multiple terminals open in a single ssh session.
moreutils – this contains a few commands for the Bash script we’ll be using. Mainly the ts command, which is how we’ll be doing timestamps for the netcat listener logging.
lsof – I use with netstat, which may need to be added, to see open ports and pids.
git – git is optional, it’s used if you want to git clone my idh-nc repo. Just know, the repo isn’t designed to install the idh, it just has template files and a walkthrough to set up the tool.
Building out the IDH
The Intrusion Detection Honeypot template files can be found in my GitHub idh-nc repo. As stated, the repo is meant to hold template files.
Create a directory called /opt honeypot with the file honeypot.sh in it. Change the permissions to -rwxr-xr-x
|
1 2 3 |
mkdir /opt/honeypot touch /opt/honeypot/honeypot.sh chmod 755 /opt/honeypot/honeypot.sh |
Copy the code from the GitHub repository under idh-nc/honeypot/honeypot.sh to the honeypot.sh file created above. While it does have a .sh extension this is a Bash script that requires some of the components built in to Bash to work.
As you’re creating the honeypot.sh file, don’t forget to change the port_array line to match your ports from the earlier nmap scan, and the interface ip address it should listen on.
|
1 2 |
port_array=(<port number> <port number>) ncat -klvnp $port 2>&1 | ts '%Y-%m-%d %H:%M:%S%z' | tee -a /var/log/honeypot/$port.log & |
To what matches your environment. In this walk-through, I changed it to:
|
1 2 |
port_array=(22 80 443 8443 8009 445 139 135) ncat -klvnp 192.168.1.105 $port 2>&1 | ts '%Y-%m-%d %H:%M:%S%z' | tee -a /var/log/honeypot/$port.log & |
If you’re going to listen on port 22, like the configuration above, you’ll want to change sshd to listen on a different port for your own access. Ncat will bind to all interfaces, so it could block your management port too.
Next create a directory for the output of the honeypot.sh script. The script is expecting to write to /var/log/honeypot directory. It will create a log for each port running. We’ll also set the permissions and change the owner to include the admin group which the user should be in. The directory should be -rwxrwxr-x.
|
1 2 3 |
mkdir /var/log/honbeypot chown root:adm -R /var/log/honeypot chmod 775 /var/log/honeypot |
Testing time
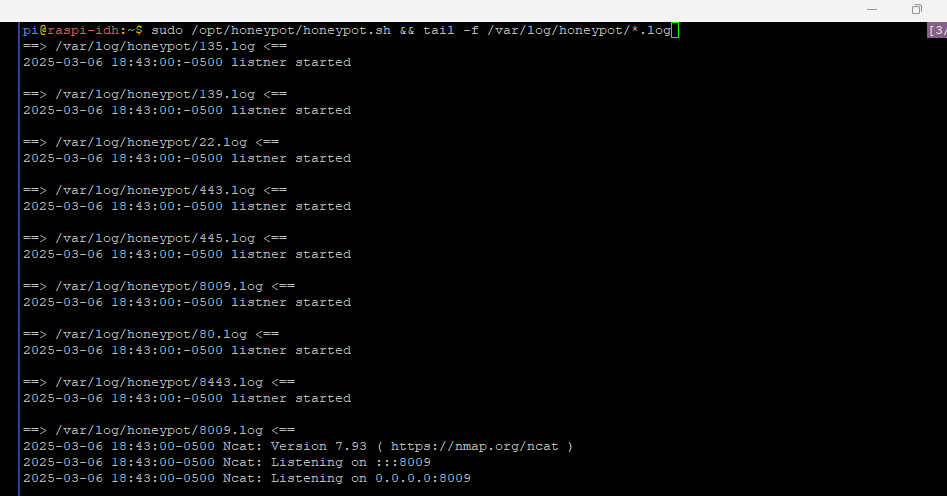
Before setting this up as a service, we want to make sure it’s working. To run the script:
|
1 |
sudo /opt/honeypot/honeypot.sh |
To check open ports are listening, use either lsof or netstat
|
1 |
sudo lsof -i -P |
or
|
1 |
sudo netstat -tpan |
Check the log files
|
1 |
tail -f /var/log/honeypot/* |
Setting up the script to run as a daemon
Create a file under /etc/systemd/system called idh-nc.service with the contents of the idh-nc.service file from the Github repo.
To set it to start at reboot
|
1 |
sudo systemctl enable idh-nc.service |
Iptables Settings
As mentioned above the nmap version of NetCat can miss some connection activity. To cover for this, I use iptables. The following commands will set up iptables to log any connection attempts to /var/log/syslog with the unique identifiers of iptables_inbound and ip6tables_inbound. After setting up the rules and saving them we’ll add iptables-persistance. We didn’t install the last package earlier because it will throw an error if the save files don’t exist.
|
1 2 3 4 5 |
iptables -I INPUT -p tcp -m state --state NEW -m limit --limit 6/min -j LOG --log-prefix='[iptables_inbound]' --log-level 4 ip6tables -I INPUT -p tcp -m state --state NEW -m limit --limit 6/min -j LOG --log-prefix='[ip6tables_inbound]' --log-level 4 iptables-save -f /etc/iptables/rules.v4 ip6tables-save -f /etc/iptables/rules.v6 sudo apt install iptables-persistence |
Monitoring the Logs
There are many different ways to get these logs in to the SIEM or log servers that feed the SIEMS. Some use agents, some take direct log feeds, some use rsyslog to import the logs to a log server and then the SIEM reads those for trigger events. Because there are multiple ways to send logs to SIEMs and log servers, I’m not going to cover that here.
However to read the logs locally I use two commands, usually in different tmux panes, when I’m SSH’d in.
|
1 2 |
tail -f /var/log/honeypot * sudo grep -E “ip6?tables” /var/log/syslog |
I could to a tail on the syslog and grep for the string(s) I want, but I don’t keep that one running all the time like I do the tail on the honeypot log directory.
honeypot logs in the directory
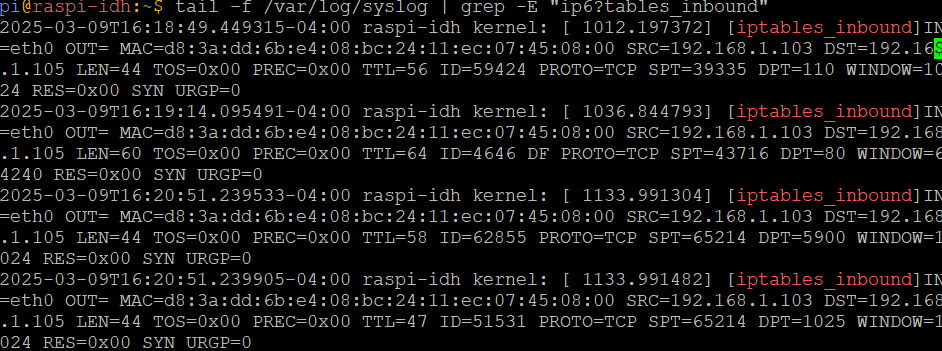
iptables logs in syslog
Caveats of this setup
- Any port in use by the system will fail. When the listener is manually started. Starting as a service has blocked things like sshd.
- Nmap scans show in the firewall logs but not in the honeypot logs
- This setup will show open ports in an nmap scan
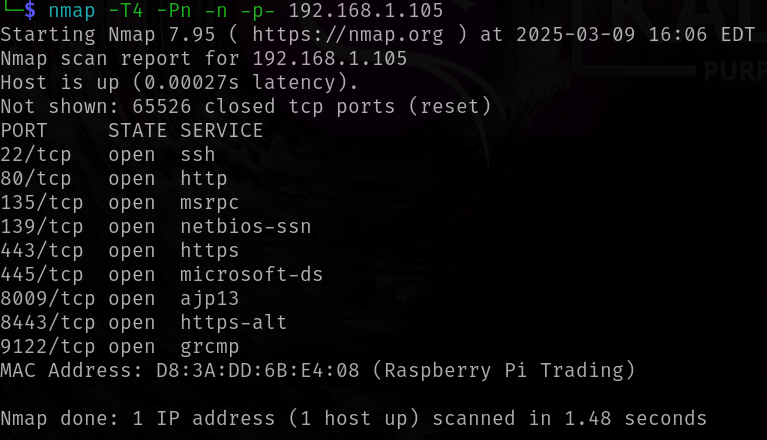
nmap scan of IDH
Future considerations
Because of some of the items mentioned, mainly multiple versions of NetCat not seeing port scans or listening on any interface, I may rebuild this in the future using SoCat instead.
What’s next?
The next blog post in this series will talk about building OpenCanary on a Raspberry Pi / Virtual machine space. It will be a 2025 walk-through. While the majority of Thinkt’s walk-through works, I’ve had problems getting OpenCanary to start when using their systemd service file.